- HubPages»
- Arts and Design»
- Graphic Art & Design»
- Design Software
Photoshop Tips: Creating a Quick Fire Effect


Introduction
Through my journeys in digital painting in Photoshop, the one thing that bothered me the most was fires. A good fire can add a lot of color and atmosphere to a scene, but a blob of red and orange... let's just say I avoided adding fires.
But that was before I discovered this technique. It allows you to create a fire fitted to the unique situation, even bending around something if needed.


Setup
Open a new document in Photoshop roughly the size of the fire you want. It doesn't have to be exact, as you can resize it later, but err on the side of too large, because cropping off empty space is better than stretching your image.
Fill the image with black.
Come on, it'll make your fire look really cool... er- hot.
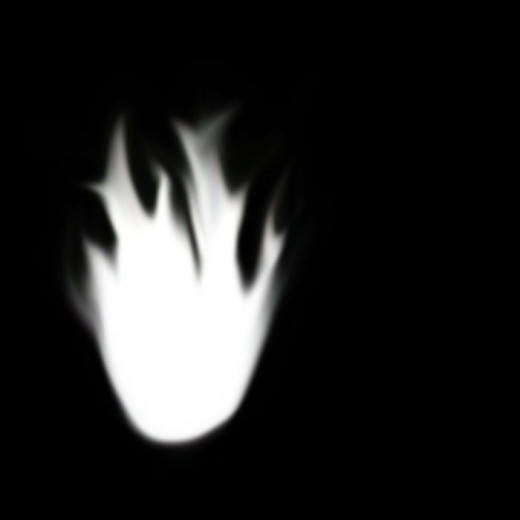
Step 1: Source
Select your brush tool, set the color to pure white, and fiddle with the hardness setting until you get a smooth circle as shown. This will be your basis for your fire, place over whatever is burning.
Step 2: Fan the Fire
Now select the smudge tool. Set the size rather small in comparison to your "ball of flame", you're going to make the individual tongues now.


Step 3: Crank up the Heat
Here's where things really take shape. Go up to the "image" dropdown list and under "adjustments" select "color balance". Here you can play around for the best fire, but for starters, let's use these settings:
- Shadows: Top slider = +30, bottom slider = -20
- Midtones: Top slider = +100, bottom slider = -100
- Highlights: Bottom slider = +100
This will tell Photoshop that you want all the dark colors a middle-intensity orange, the medium colors a high intensity orange, and the lightest colors yellow.
The image on the right below shows what your fire will look like after applying these settings.

Step 4: Further Adjustments
Not bad! But still, not many fires I've seen are pure white at the center. Let's fix that next.
Select the "Image" dropdown list again. Under "Adjustments" select "Photo Filter".
In the window that pops up, you're given an area to choose from a selection of preset filters, or make you own; and an area to set the intensity of the filter, and whether or not it darkens the image it's applied to.
I chose the preset filter "yellow" with an intensity of 30% with "preserve luminosity" unchecked (allowing the filter to darken the white).

Step 5: Isolation of the Inflammation
You can stay at that last step and tweak the colors to your hearts content, or you can crop out the black and integrate it into your project.
This is the easiest part.
Under the "Select" dropdown menu choose "Color Range...".
Select the black.
Click OK.
Cut.
Done!
Closing Notes
- You can adjust the transparency of the layer to make a lighter fire.
- Animating a fire in this way is harder than you'd think, if anyone can do it I tip my hat to him/her.